Spectrum
Spectrum is a spray paint machine that can create hundreds of colors instantly—likely the world's first of its kind, and costs under $150 to build one yourself. It takes basic colors from regular spray paint cans and precisely mixes them in real time to spray out the exact color you need.
Article on IEEE Spectrum (IEEE’s flagship magazine): A New Way to Spray Paint Color
I've always loved spray-painted murals—no brushes or mixing palettes, just grab a can and start spraying! Spray paint works by atomizing liquid paint into tiny droplets that create smooth, uniform finishes—much faster and more even than brush application. It has revolutionized how we paint large surfaces. But spray paint has one fundamental limitation: you can't blend colors like regular paint. Every shade needs its own can, meaning artists carry dozens for a single mural. As far as I know, there is no device (not even experimental) that generates spray paint colors instantly. This inspired me to build Spectrum
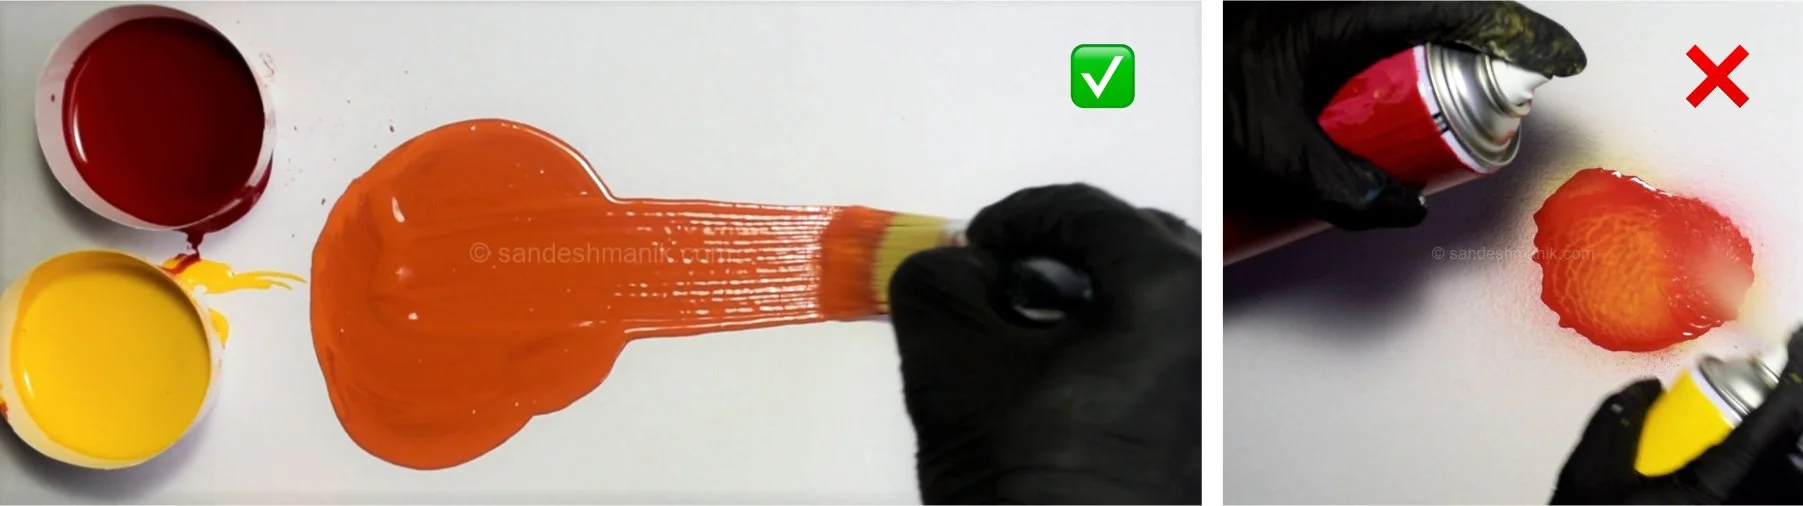
Comparison: making orange with red and yellow regular paint vs spray paint.
Design Goals
Personal projects don't come with predefined requirements, but I set clear goals anyway to keep the challenge focused:
Real-Time Color Mixing: The system had to create colors as you spray, not pre-mix batches and store them in reservoirs. This would allow instant switching between hundreds of colors without waste—you only mix what you actually spray. This constraint ruled out any intermediate storage
Work with Store-Bought Cans: The machine had to use regular spray paint cans available in stores—no custom cartridges or proprietary refills. This also meant relying on the cans' built-in pressure rather than external pumps, keeping the system simple.
DIY Friendly: Since I planned to make Spectrum open source, the design needed to be inexpensive and built with widely available parts and tools. My student budget made this requirement non-negotiable anyway.
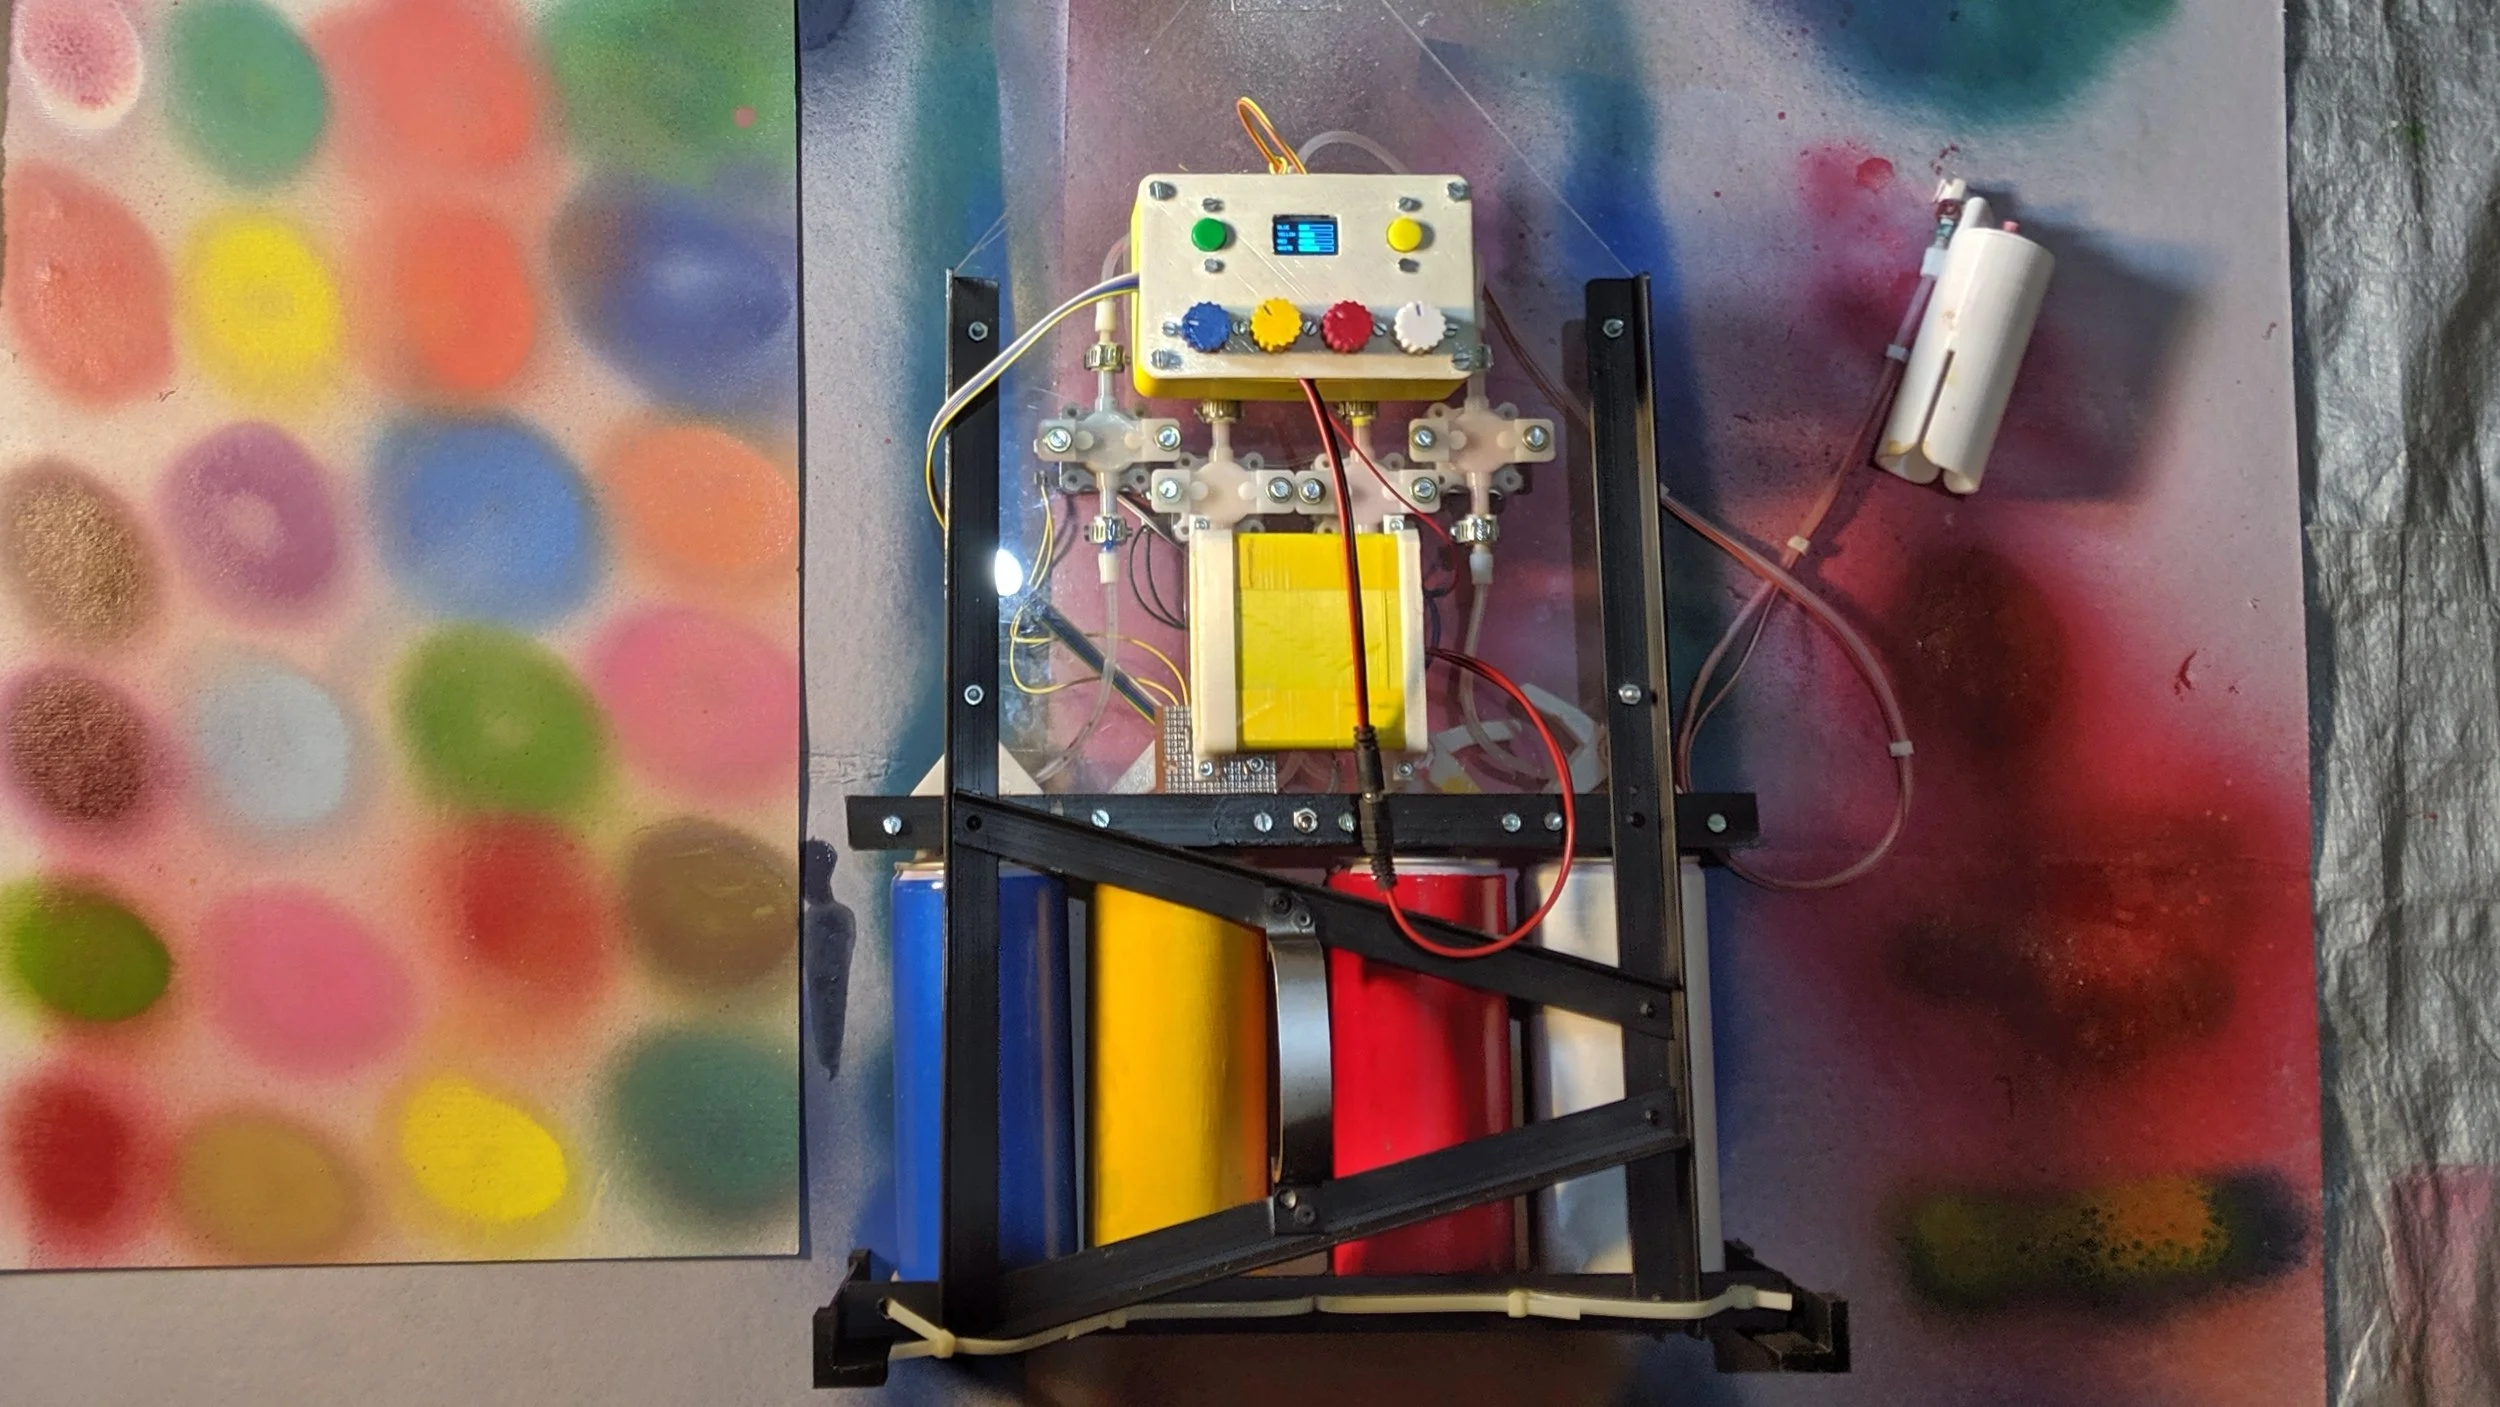
Spectrum, and its sprayed out colors.
Core Technical Challenge:
The resulting core challenge had two parts:
How do you precisely dose tiny amounts of pressurized paint from spray cans?
How do you mix them in real-time before they exit the nozzle?
I decided to tackle the mixing challenge first because I wanted to know whether paint in such small quantities could even blend properly to before being sprayed out.
The Paint-Mixing Challenge
Most existing micro-mixing solutions handle low-pressure, non-reactive fluids at slow flow rates. Mixing high-pressure, easily-drying paint in real-time was largely uncharted territory.
Failed Early Experiments
I tried several approaches, though I'll admit my documentation was pretty sparse in those days—especially when experiments failed spectacularly, taking notes was the last thing on my mind.
One attempt involved having a flow regulator on each can and micro-mixing channels where paint from different cans would flow together and mix. But I quickly discovered a fundamental problem—spray cans never have exactly equal internal pressures. When multiple cans fed into a shared tube simultaneously, the pressure differences caused backflow and paint leakage everywhere. Worse, the mixing channels created significant pressure drops, forcing paint backwards and reducing spray force.
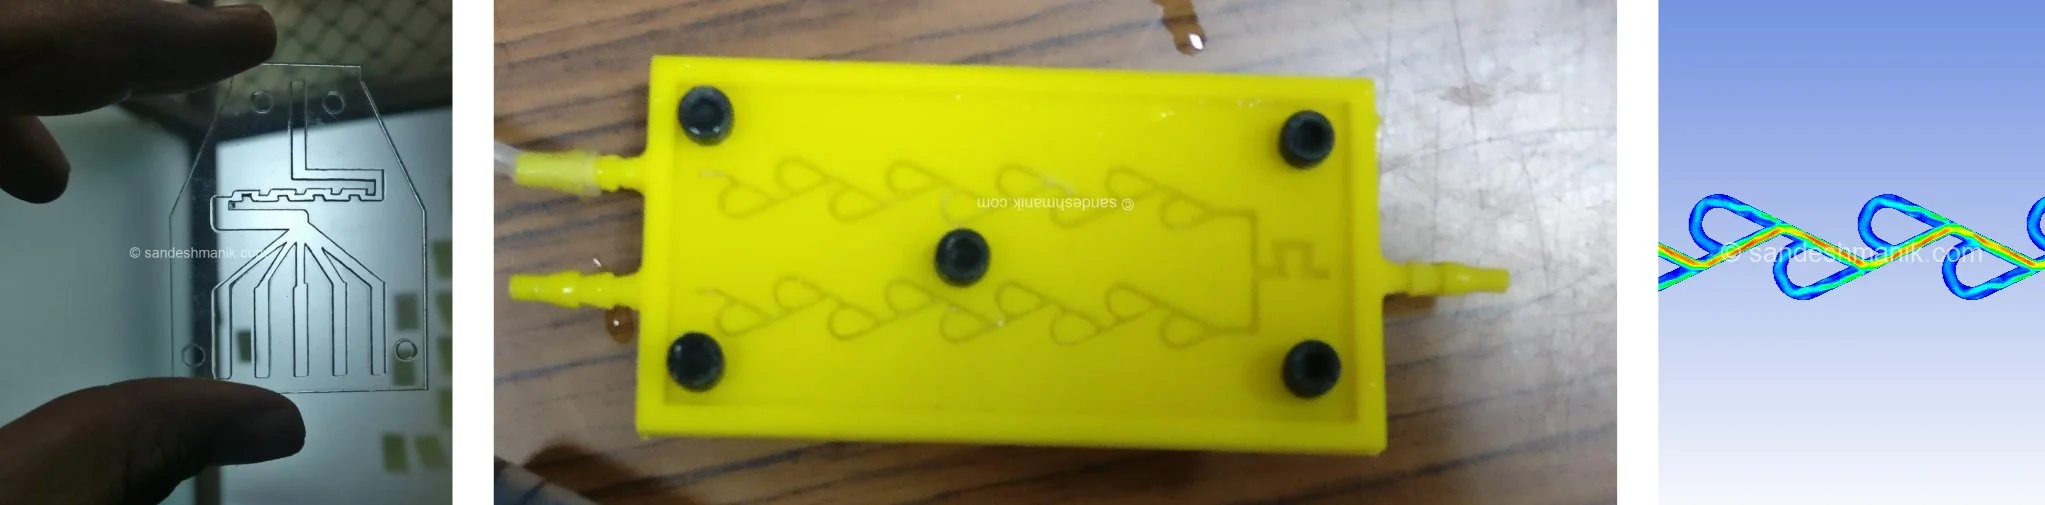
One-way-flow micro-mixing channel
The Breakthrough: Pulse-Based Micro-Mixing
Learning from the previous failures, I tried a different approach—what if only one color entered the tube at any moment? No simultaneous flows meant no backflow.
I rigged up a simple test: valves would alternate between colors in rapid pulses, with color ratios controlled by how long each pulse lasted. I sprayed onto white paper, expecting to see distinct stripes of color since there was no mixing channel. Instead, they mixed beautifully. The turbulence from the alternating pulses in the narrow tube was intense enough to completely blend the color bursts before they exited the nozzle. And of course, no back-flow issues since only one can was ever open at a time.
After weeks of testing different tube sizes and pulse timings, I narrowed down the optimal parameters: 1mm diameter tubing with pulses under 250 milliseconds. The tube couldn't be too narrow (would cause pressure drops) or too wide (would create reservoirs and slow color transitions). At 1mm, color changes happened in under 1-2 seconds.
This meant I could create any color just by timing the pulses. Want baby-pink (about 1:8 red-to-white)? White valve opens for 250 milliseconds, red for 30 milliseconds, repeat. The rapid alternation produces a perfectly uniform pink as it sprays. If you changed the color ratio, it would be reflected in the spray within 1-2 seconds.
For more details, here’s a paper I’ve written: Instant Spray Paint Color Generation via Pulse-Modulated Micro-Mixing of Pressurized Paint (TechRxiv Preprint, 2025)
Stop-motion animation depicting pulse-based micro-mixing
The Paint-Dosing Challenge
With the pulse mixing method proven, I now needed the core hardware to make it work—specifically, electronically controlled valves that could handle spray paint pressure (maximum 100 psi) and switch fast enough for rapid pulses. I needed a response time (the shortest duration the valve takes to physically respond to a signal) of about 30 milliseconds. This way I could actually have a 1:8 ratio where the longest pulse is 250 ms long.
Early Workarounds
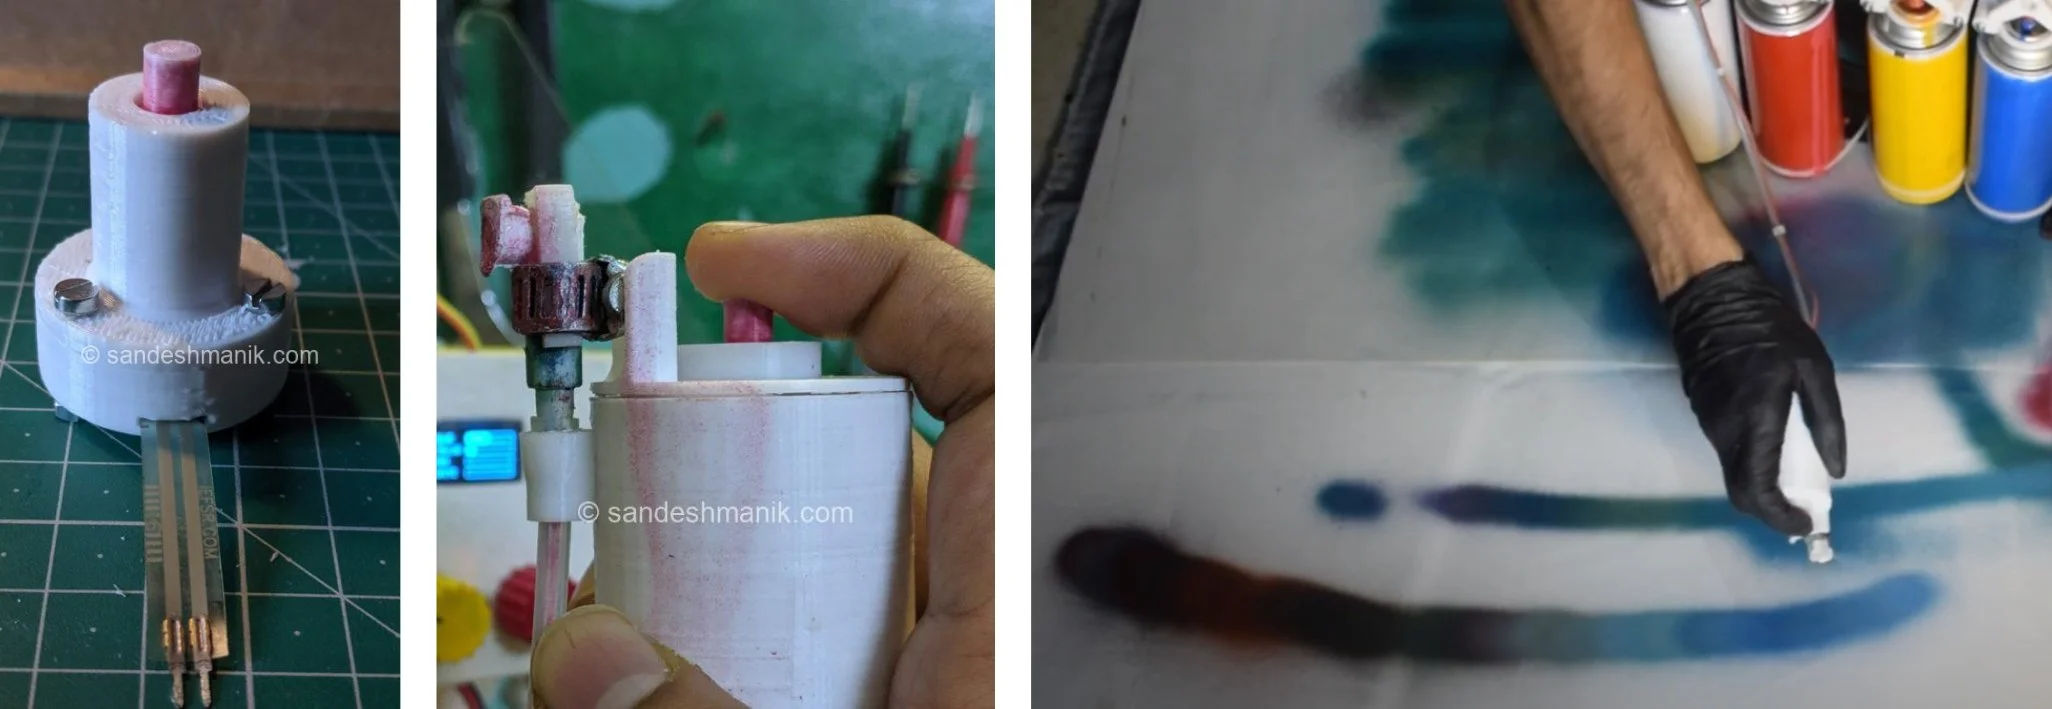
For the early pulse-mixing experiments, I started with widely available water-purifier solenoid valves—they were fast enough and pressure-rated for the job. I even 3D-printed custom fillers to eliminate internal cavities where paint could pool and slow color changes. And while these valves had a spring-loaded plunger inside that wasn't designed to stop backflow, it worked well enough when there was pressure on the inlet side—the paint always exited through the atomizing nozzle rather than flowing backward.
The modified water-purifier solenoid valves with 3-D printed fillers and connectors
The Problems: While this worked initially, the valves weren't built for paint. The valve mechanism wasn't isolated from the fluid pathway (fine for water, disastrous for paint), so paint clogged the internal parts and required cleaning the clogged valve after every use. Additionally, the valve only prevented back-flow when the inlet was pressurized—if a paint can got disconnected accidentally, paint would leak everywhere. (Back-flow is when fluid moves in the reverse direction through a valve, from the outlet to the inlet.)
Did I really have to invent a valve?
Most off-the-shelf electronic valves designed for high pressures are meant for clean fluids like water or oil, and a lot of them couldn't switch fast enough for my needs. The few that could handle paint were ridiculously expensive, oversized, and designed for much larger flow rates.
So yes, I really did need to design a custom valve—one optimized for fast switching, small fluid quantities that are under high-pressure, and reactive fluids like paint.
Requirements for a New Valve
After all the experiments and failures, I knew exactly what I needed—and why each requirement mattered. Every item on this list came from a painful lesson:
Isolated Fluid Pathway: Keep paint completely separate from the valve mechanism to prevent clogging.
Normally Closed: Default to closed when unpowered, so no leaks if power fails.
Total Back-flow Prevention: Stop back-flow even with no inlet pressure—essential to prevent massive leaks if cans get disconnected.
Fast Response: Have a response time of under 30 milliseconds for rapid pulse control.
Pressure Handling: Withstand spray paint pressure (up to 100 psi) with safety margin.
Inexpensive and DIY-Friendly: Built from inexpensive, readily available parts.
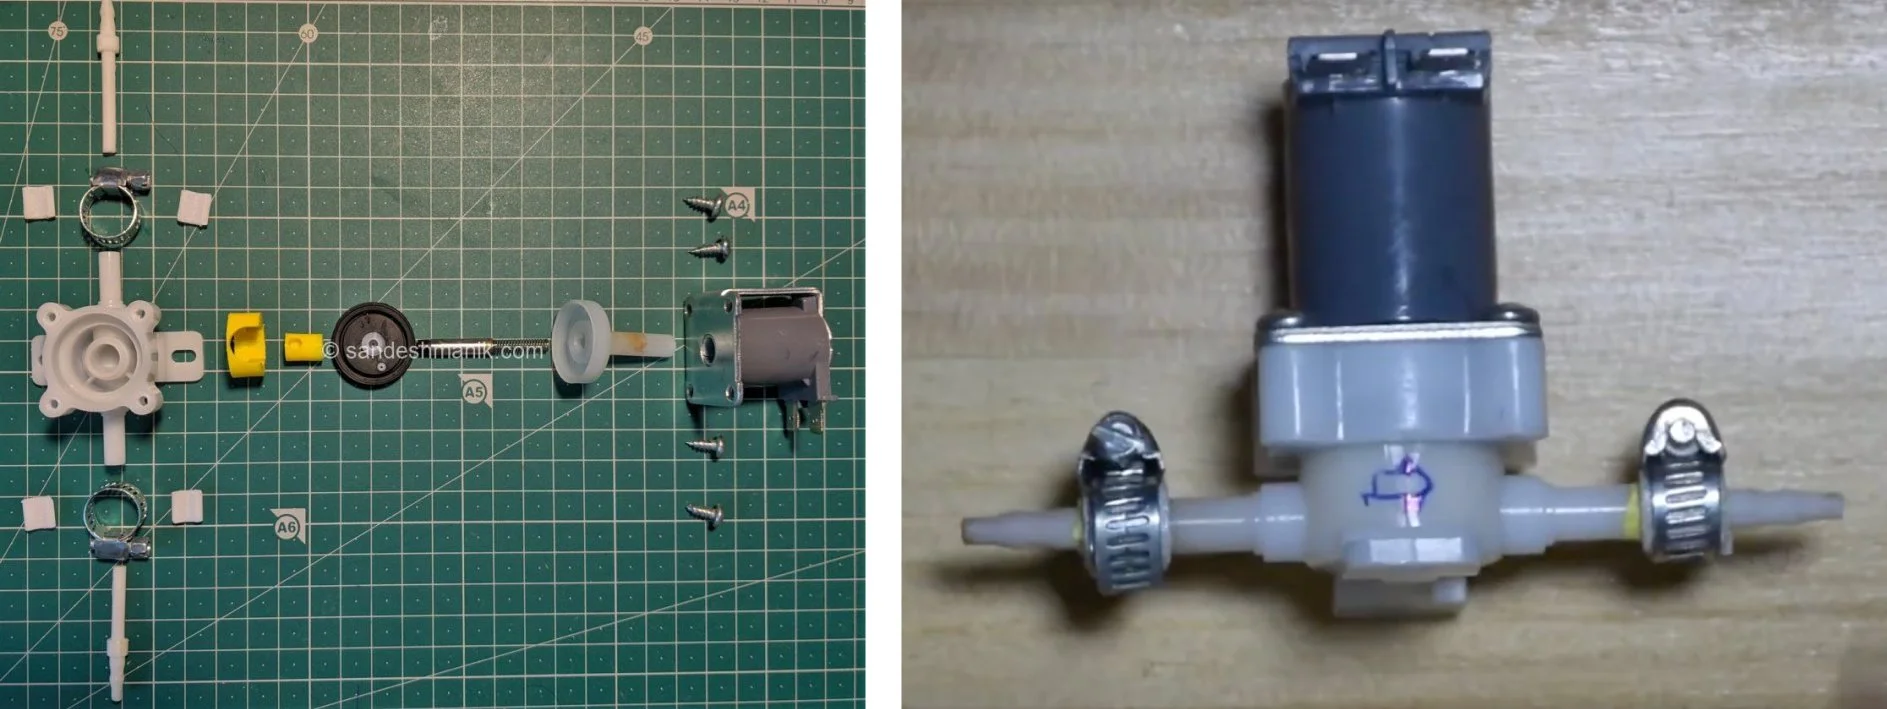
Spectrum’s Rotary Pinch Valve
After numerous design iterations, I created Spectrum's Rotary Pinch Valve. The concept is elegantly simple: a motor-driven lever pinches a flexible tube to control paint flow. While pinch valves exist, I needed one that was electronically controlled, normally closed, and fast enough for rapid pulsing. So I designed one from scratch, optimizing it for Spectrum.
How it Works: A motor-powered lever pinches flexible silicone tubing against a wall to stop paint flow. A bearing at the lever's tip prevents wear as it rolls over the tube. When the lever rotates down, it pinches closed; rotating back releases the flow. The paint stays inside the tube and never touches the mechanism—no clogging.
Backflow Prevention: When the lever is fully closed, fluid pressure acts perpendicular to the lever arm, creating no rotational force. This means no backflow even with high outlet pressure—the valve stays firmly closed regardless of pressure differences.
Normally Closed Design: A spring pulls the lever into the closed position when unpowered, ensuring the valve stays shut by default—critical to prevent leaks.
Pinching mechanism, combined with a spring for a normally-closed design.

Spring holds the lever back by default, making the valve normally closed.
The Engineering Details: The tricky part was balancing competing requirements: the motor needed enough torque to pinch against paint pressure while being fast enough for 30ms response times. The spring had to reliably close the valve when unpowered without overpowering the motor during opening.
I've written a detailed article about developing the valve: Inventing a Valve
For the engineering analysis with calculations, I’ve written this paper: A Novel Rotary Pinch Valve Design for Precision Control of Isolated High-Pressure Fluids (TechRxiv Preprint, 2025)
Rest of the System
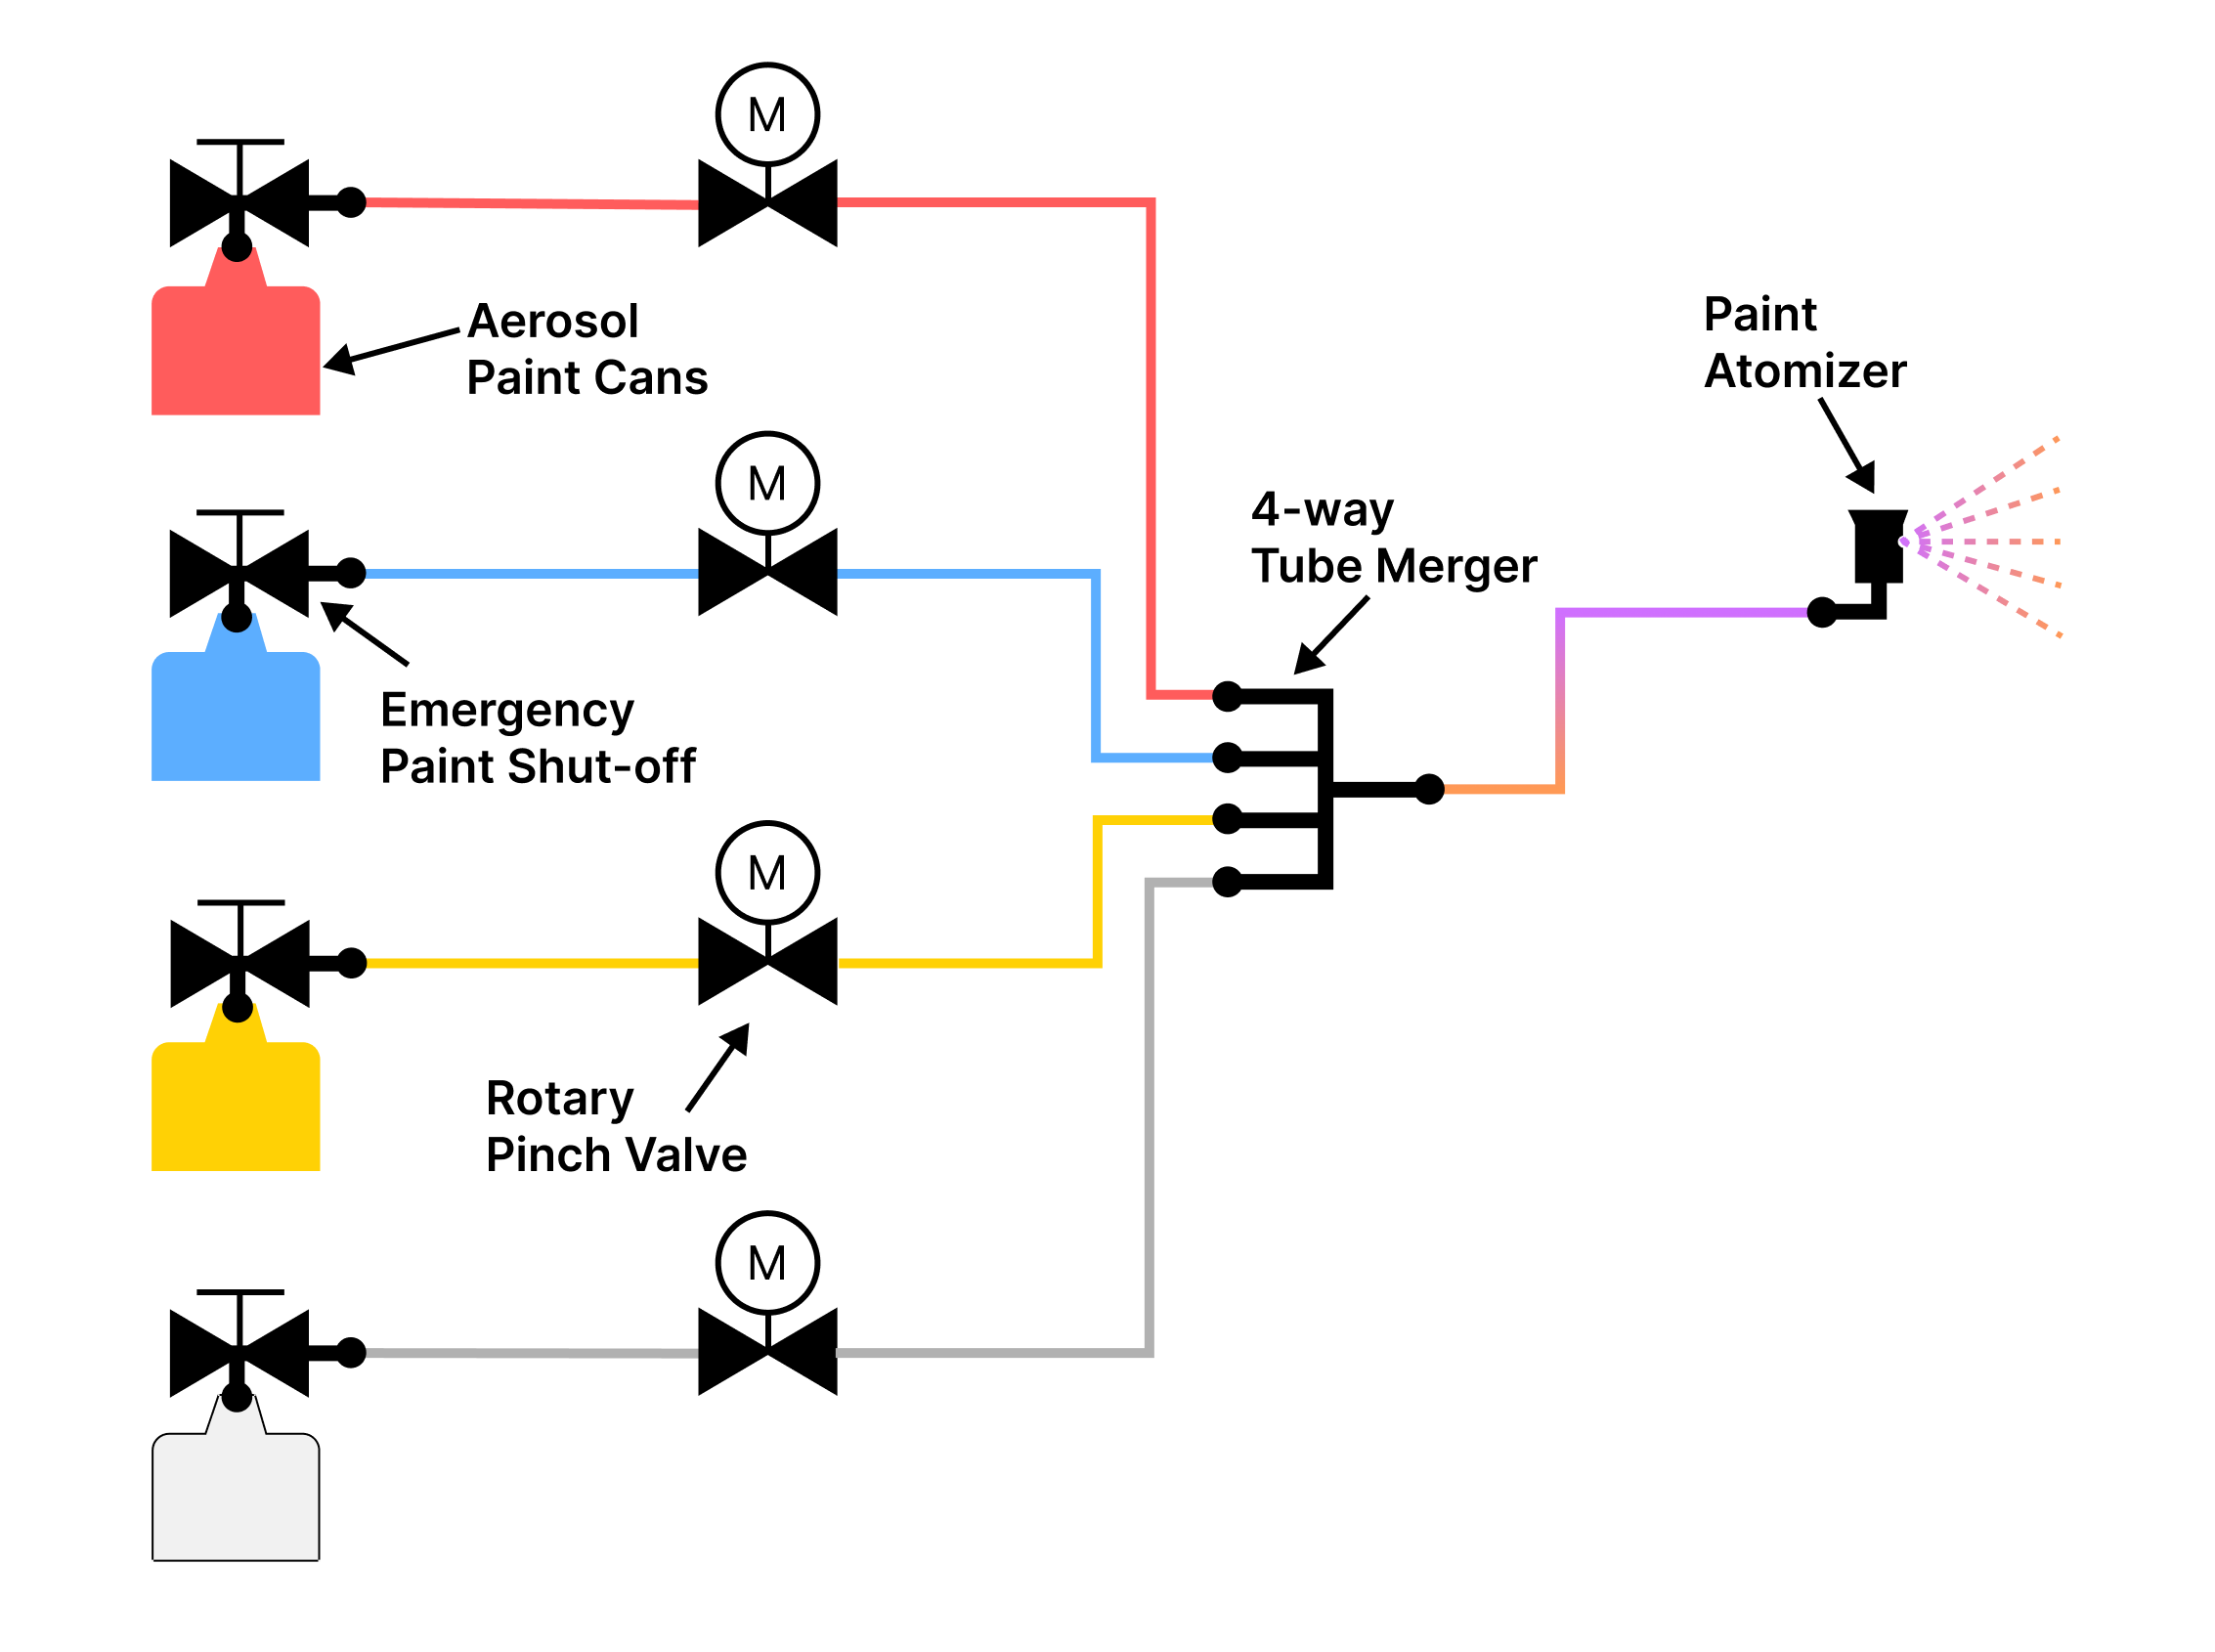
Spectrum’s system overview
The valves solved the core technical challenge, but I still needed to build Spectrum around them. How do you safely tap into pressurized spray paint cans? How do you build a pipeline system with all the connectors to route paint from multiple cans through valves and merge them together? And critically—how do you prevent paint from spraying everywhere if something goes wrong?
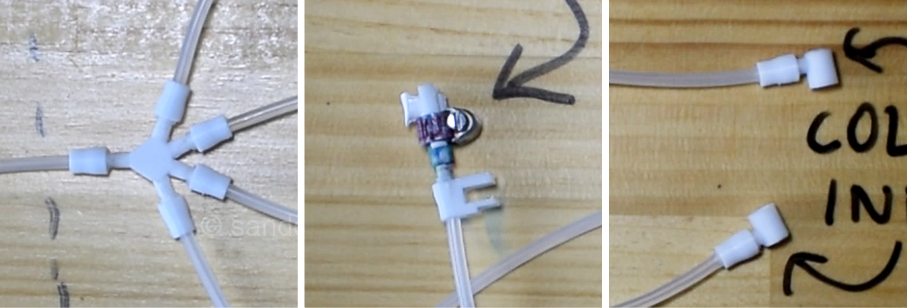
Pipeline
The tubing and connectors that form Spectrum’s pipeline.
Silicone Tubing
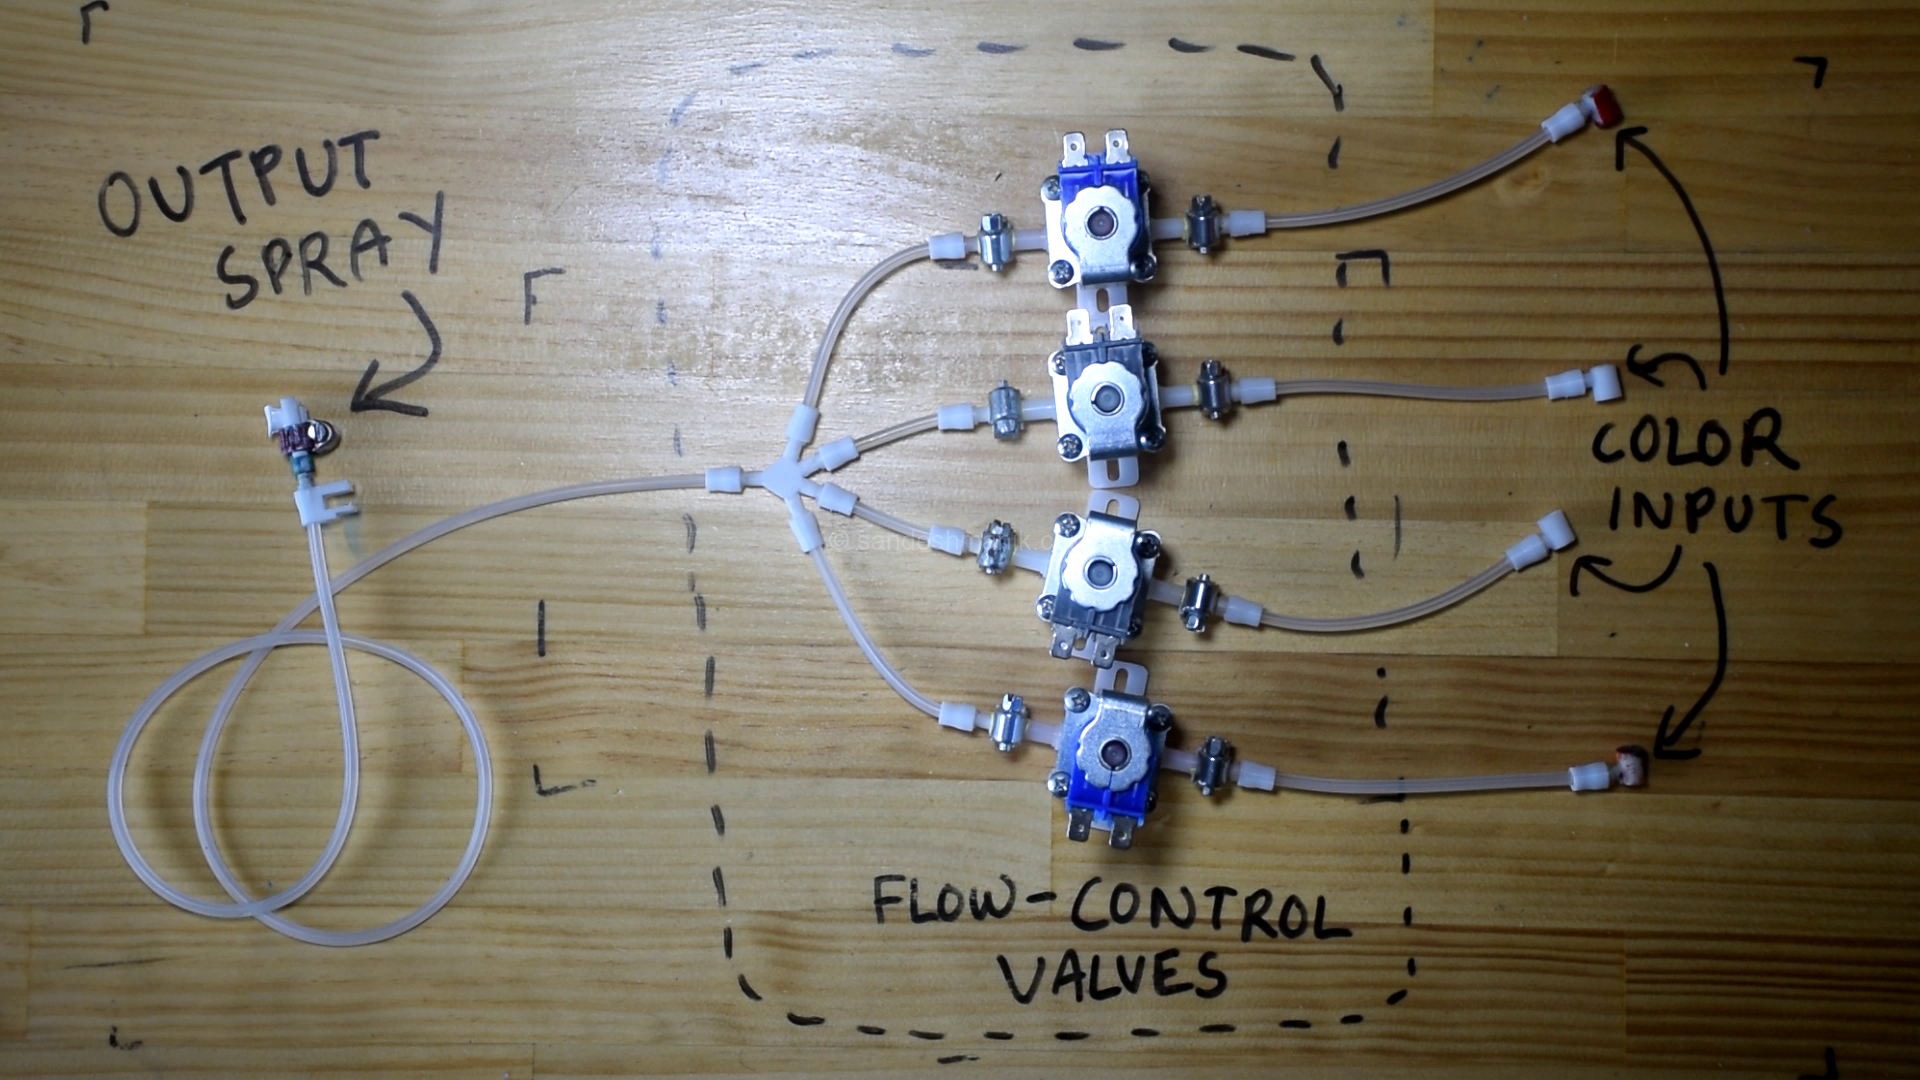
The Paint Pipeline with connectors
Silicone tubes were perfect for this application—they're narrow enough to carry small paint quantities, transparent so you can spot clogs, hydrophobic so paint doesn't stick, and flexible enough to work with pinch valves and barbed connectors.
After testing various sizes, I settled on 1mm inner diameter and 4mm outer diameter. Narrower tubes caused pressure drops that hurt spray performance. Wider tubes held too much paint volume, making the rapid pulses less effective at mixing. The 4mm outer diameter provided enough wall thickness to handle pressure while maintaining flexibility for the pinch valve mechanism
3D printed Barbed Connectors
Barbed connectors with spring clamps work best for flexible tubes under pressure, but I hit a problem—I couldn't find barbed connectors for 1mm tubes in the custom geometries my design required. So I 3D-printed my own: four intake connectors (one for each paint can), one 4-to-1 splitter that merged all paint lines, and one final connector for the spray nozzle.
3D Printing Material: PETG
3D printed connectors
Finding the right material for pressure-tight connectors took considerable experimentation, especially on my budget FDM printer (Creality Ender 3). PLA was a non-starter—micro-gaps between layers made it leak-prone, and it becomes brittle over time. I even tried injection-molding HDPE at home, but results were inconsistent.
PETG turned out to be perfect: layer adhesion was excellent (no leaks), it resists paint solvents and UV degradation, and it prints reliably on cheap printers without warping. Exactly what I needed for durable, pressure-tight connectors.
Paint Intake and Emergency Shut-off
Since the valves controlled paint flow through rapid pulses, the spray paint cans needed to provide continuous flow to the valves—meaning their nozzles had to stay pressed down the entire time. This also meant I needed a way to instantly shut off that flow in case of emergencies.
Toggle Mechanism: I designed a simple cam-and-lever toggle system for each paint can. A cam sits on top of the spray nozzle, connected to a lever. Rotating the lever down presses the cam against the nozzle, locking it in the "on" position for continuous paint flow. Pulling the lever back up instantly releases the nozzle, stopping flow completely.
Toggle mechanism for paint intake and emergency shut-off
Controls:
An Arduino Nano serves as the system's brain, reading inputs from the control panel and spray trigger, then controlling the stepper motor drivers that operate each valve with precise pulse timing.
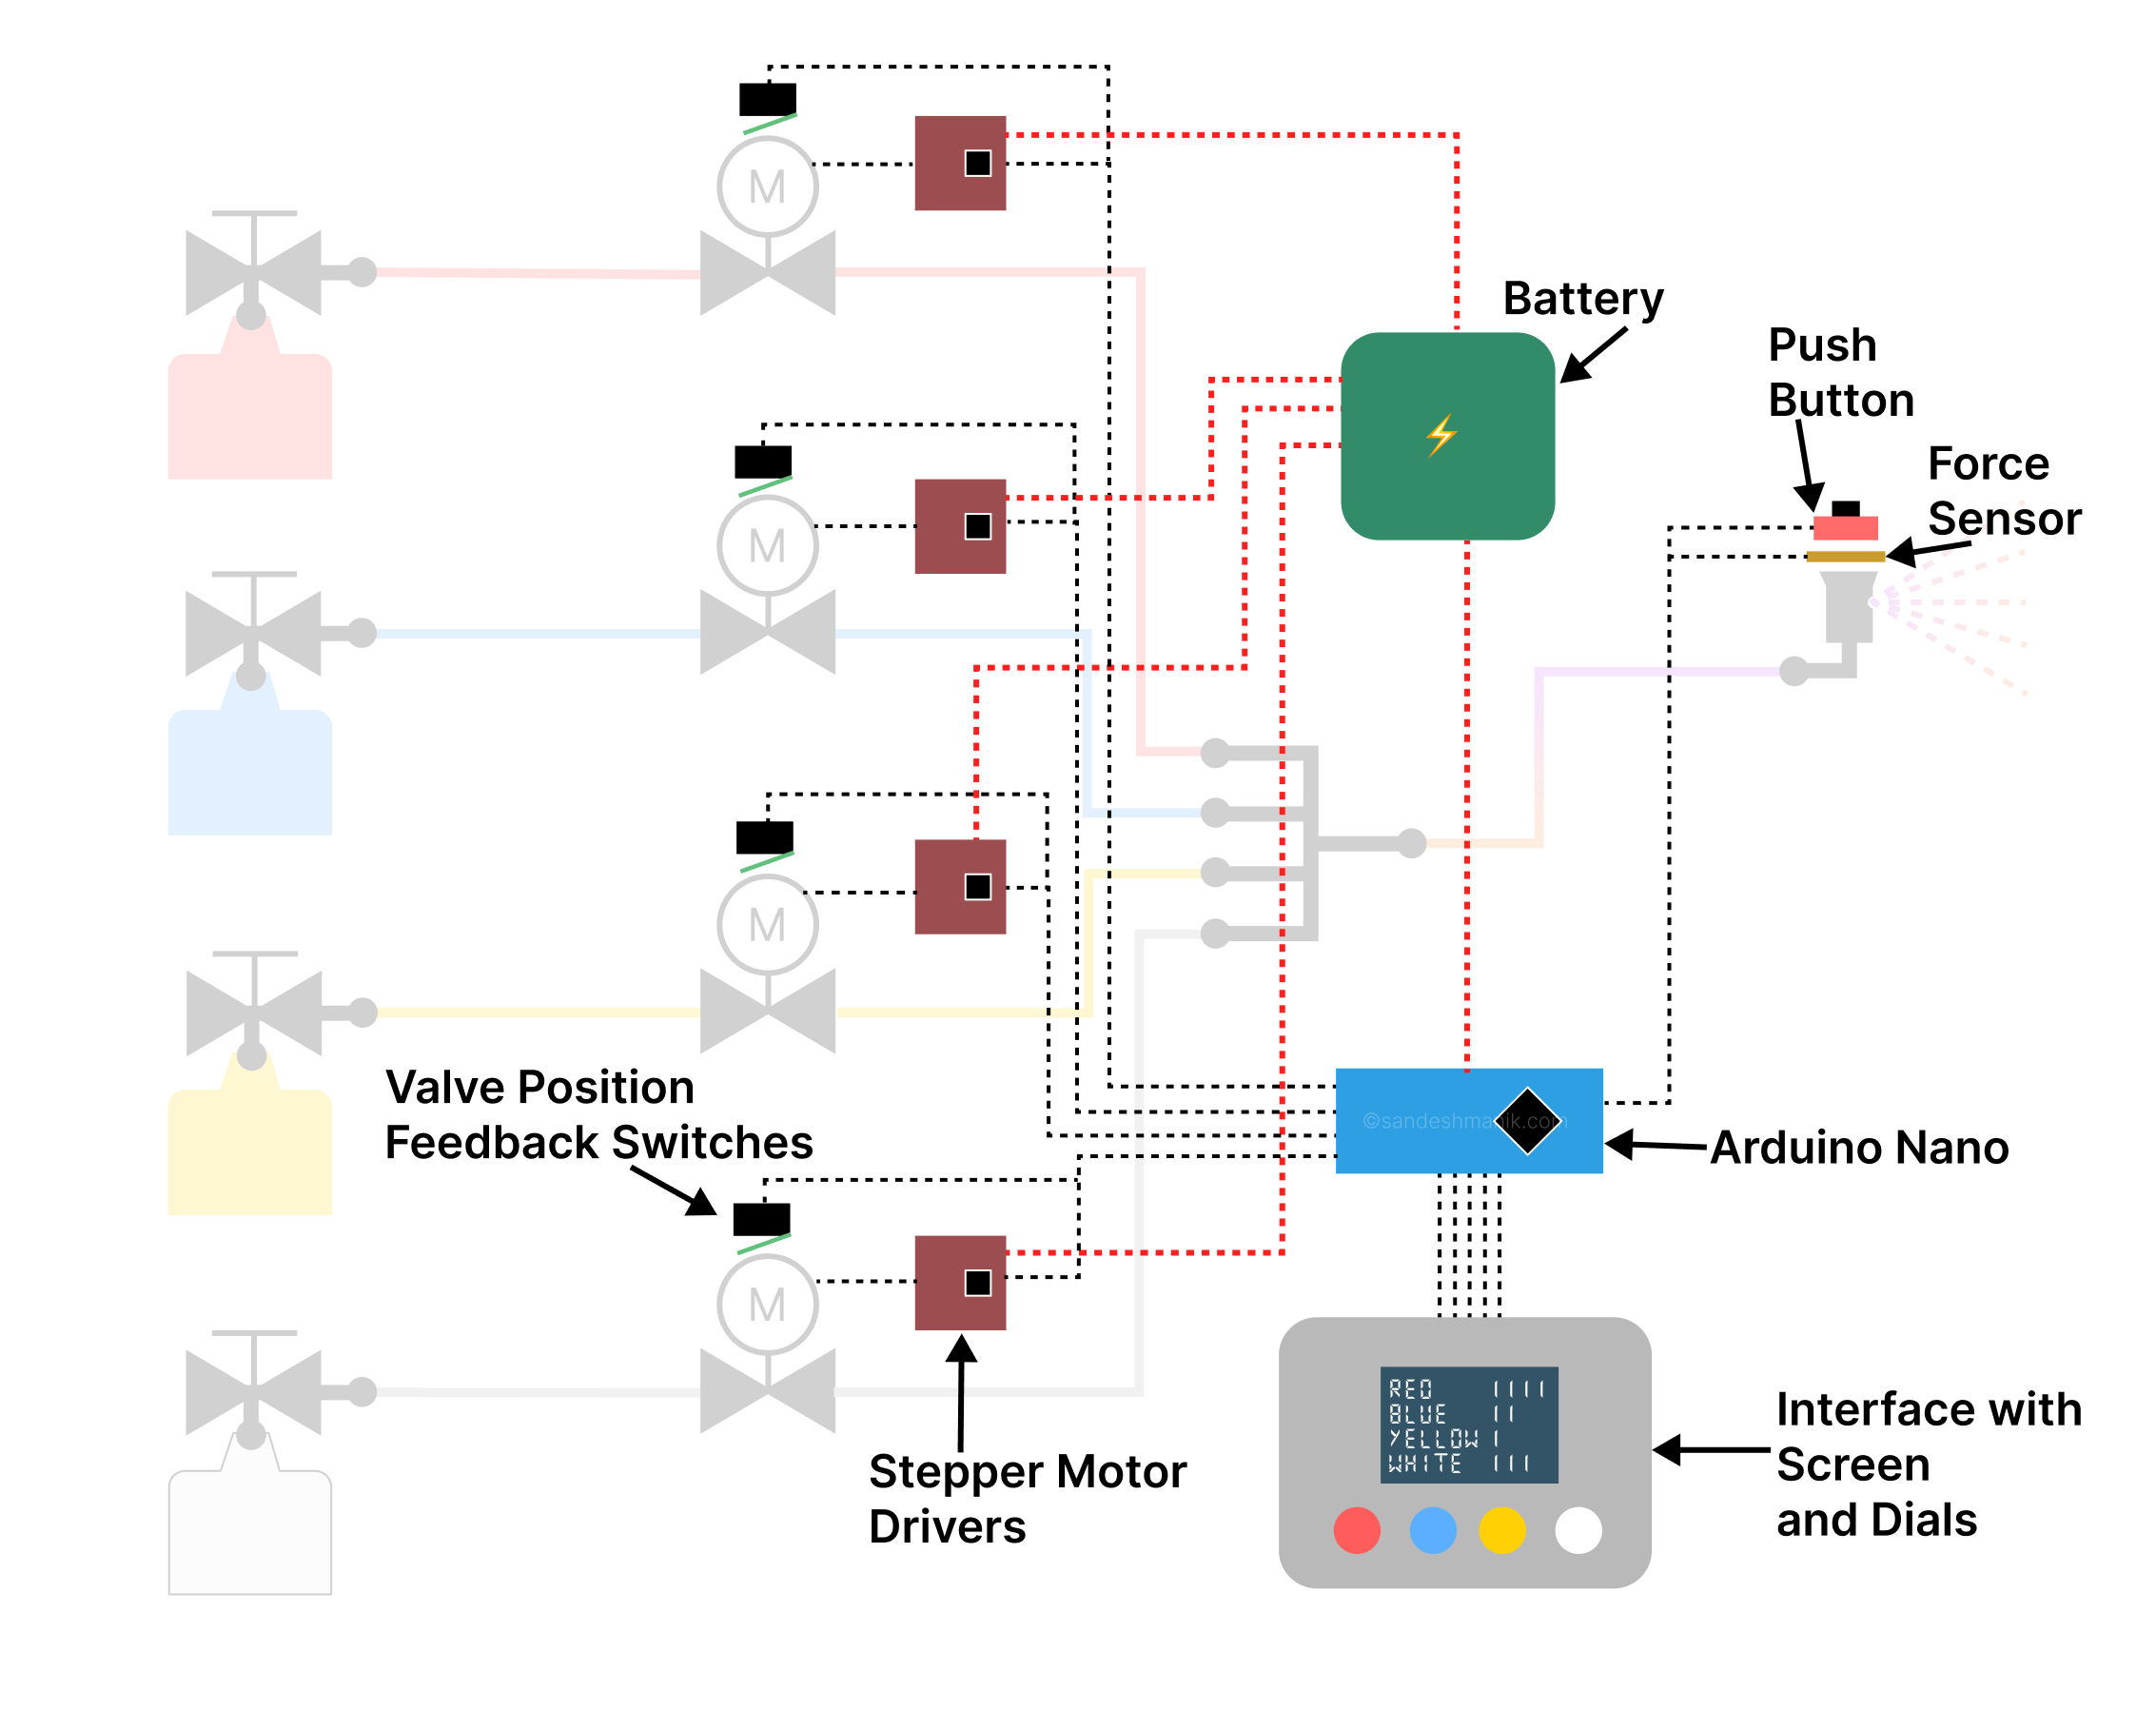
Spectrum Controls Overview
Early Interface Failures
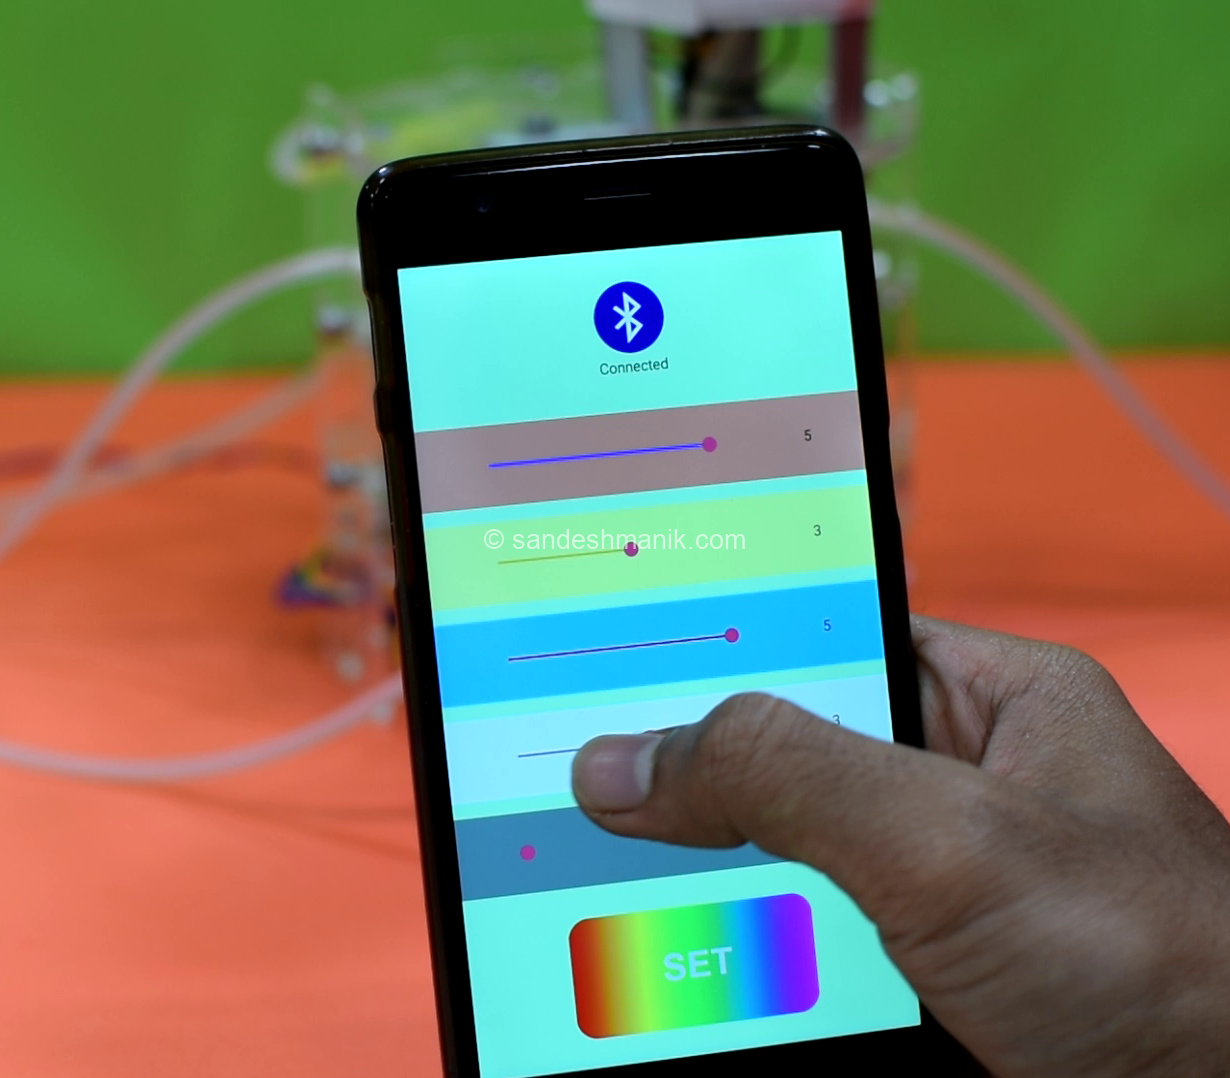
Earlier Spectrum App
I initially tried a smartphone app connected via Bluetooth—until I realized that touching a phone screen while holding a spray paint can covered in paint was a terrible idea.
I also experimented with letting users visually pick colors on a screen, but translating RGB values into paint mixing ratios turned out to be deceptively complex. Screen colors and mixed paint don't behave the same way, and getting accurate color matching would have required extensive calibration for each paint brand.
Back to Basics: Physical Controls
I abandoned the digital interface and went analog. A physical control panel mounted on the machine has four large rotary dials—one per base color—that let you set ratios from 1 to 8. A small OLED screen shows your current settings.
This turned out to be perfect for actual use. You can adjust colors while spraying, turn dials with messy hands, and see at a glance what ratio you're mixing. Sometimes the simplest solution really is the best.
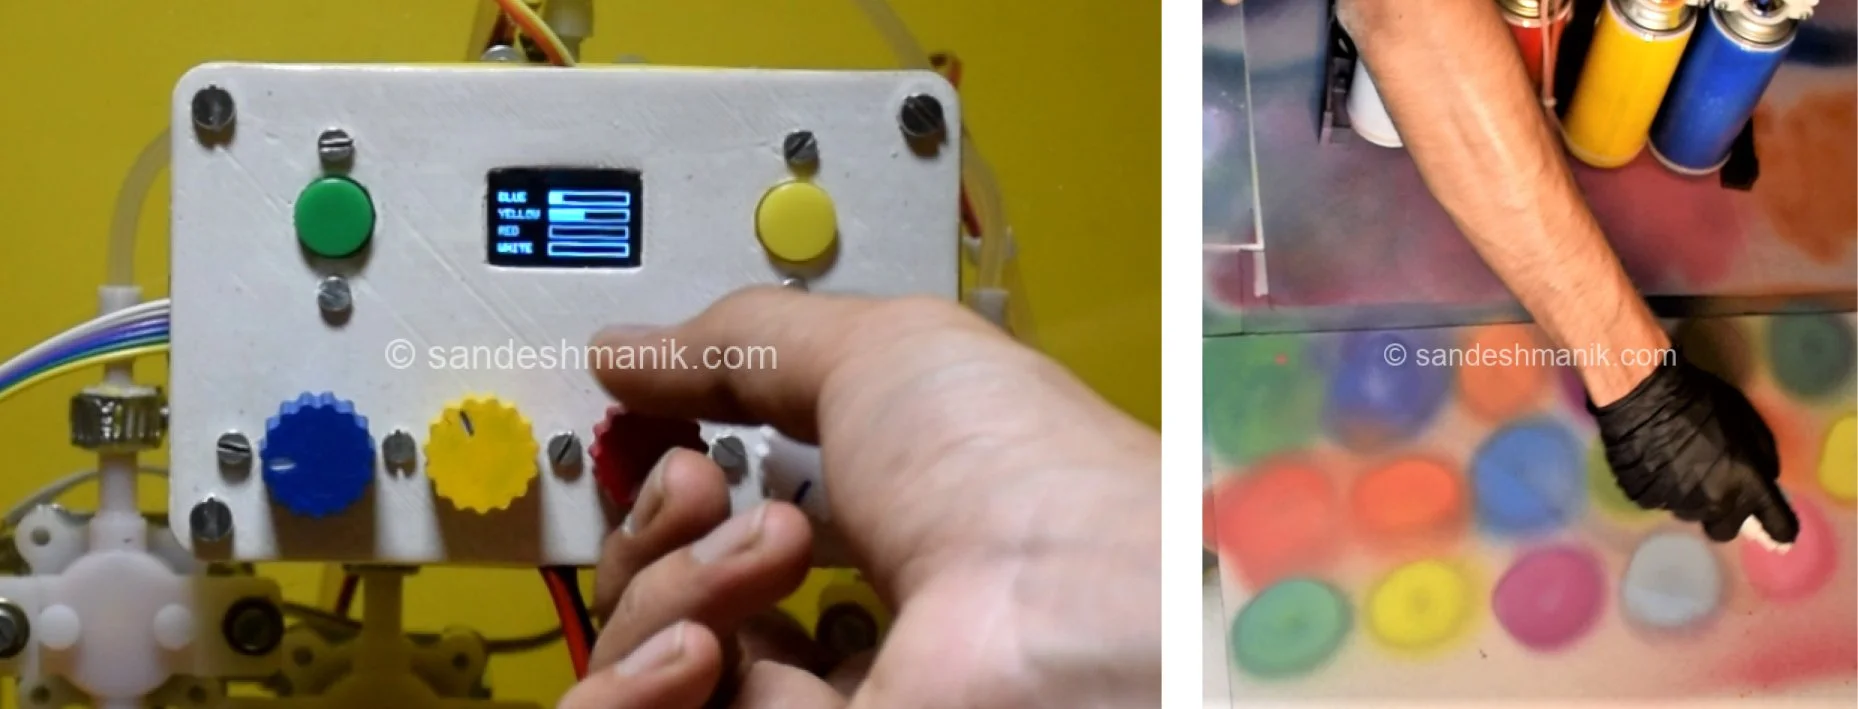
Simple interface with dials and system status screen; Spray colors created by Spectrum
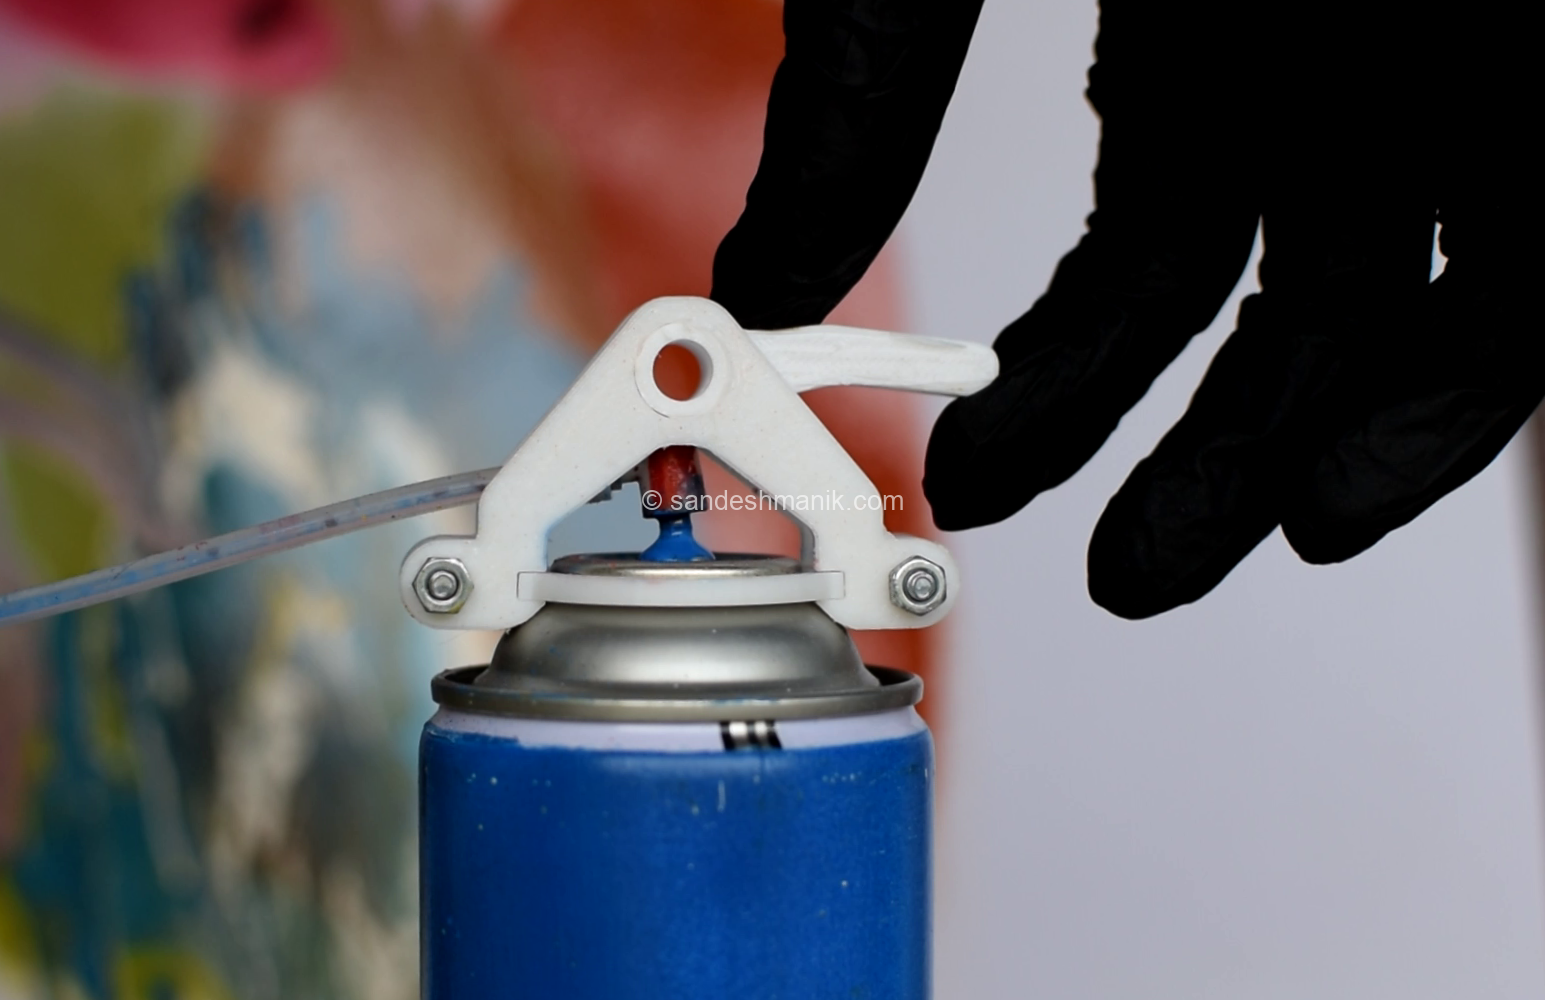
Triggering the Spray
At the end of the pipeline sits the spray atomizing nozzle. Unlike a regular spray paint can where the nozzle actually controls flow, Spectrum's nozzle has no spring or valve—the electronic valves control everything. When the valves are closed, there's no spray.
The Trigger Mechanism : I added a spring-loaded pushbutton on top of the nozzle to act as a trigger. Pressing it signals the Arduino to open the valves and start spraying. The spring provides tactile feedback, requiring a bit of travel before activating—just like pressing a regular spray can feels natural.
Force Sensing and Gradient Mode: I also added a force sensor underneath the trigger button to measure how hard you press. This enabled "Gradient Mode"—one of Spectrum's most unique features. Set two extreme colors, and the system smoothly transitions between them based on trigger pressure. Light press gives you one color, full press gives you another, with perfectly smooth gradients in between.
This dynamic color control showcases what real-time micro-mixing makes possible—something that would be impossible with pre-mixed paint or batch systems.
Force-sensing nozzle (left) and color gradient sprayed out (right)
What’s Next
The entire build costs under $150, with all parts readily available or 3D-printable with basic maker tools. If there’s enough interest, I can make Spectrum fully open source with complete build instructions, design files, and code.
The possibilities for enhancing this machine are endless—imagine integrating it with a camera and wall-tracking system to create an autonomous mural-making robot. Real-time spray paint color mixing opens up creative painting possibilities for both humans and robots that have never existed before.
Reflections
This was one of my most challenging projects, started on a shoestring budget as a college student in India and taking 3 years to finish. It failed spectacularly multiple times before finally working, so it taught me a bit about resilience too.
I didn't build this to create a business or publish papers. I built it simply because it had never been done before and sounded like so much fun. To me, this is just personal expression, or art. But I still learned an incredible amount—CFD, control systems, 3D printing, valve design—at a much faster pace and deeper level because I was solving a truly interdisciplinary problem I cared about, not because I needed to pass a course.
I'm excited to share this with the maker community. If this inspires anyone to work on a challenging project for the fun of it, I'm happy.
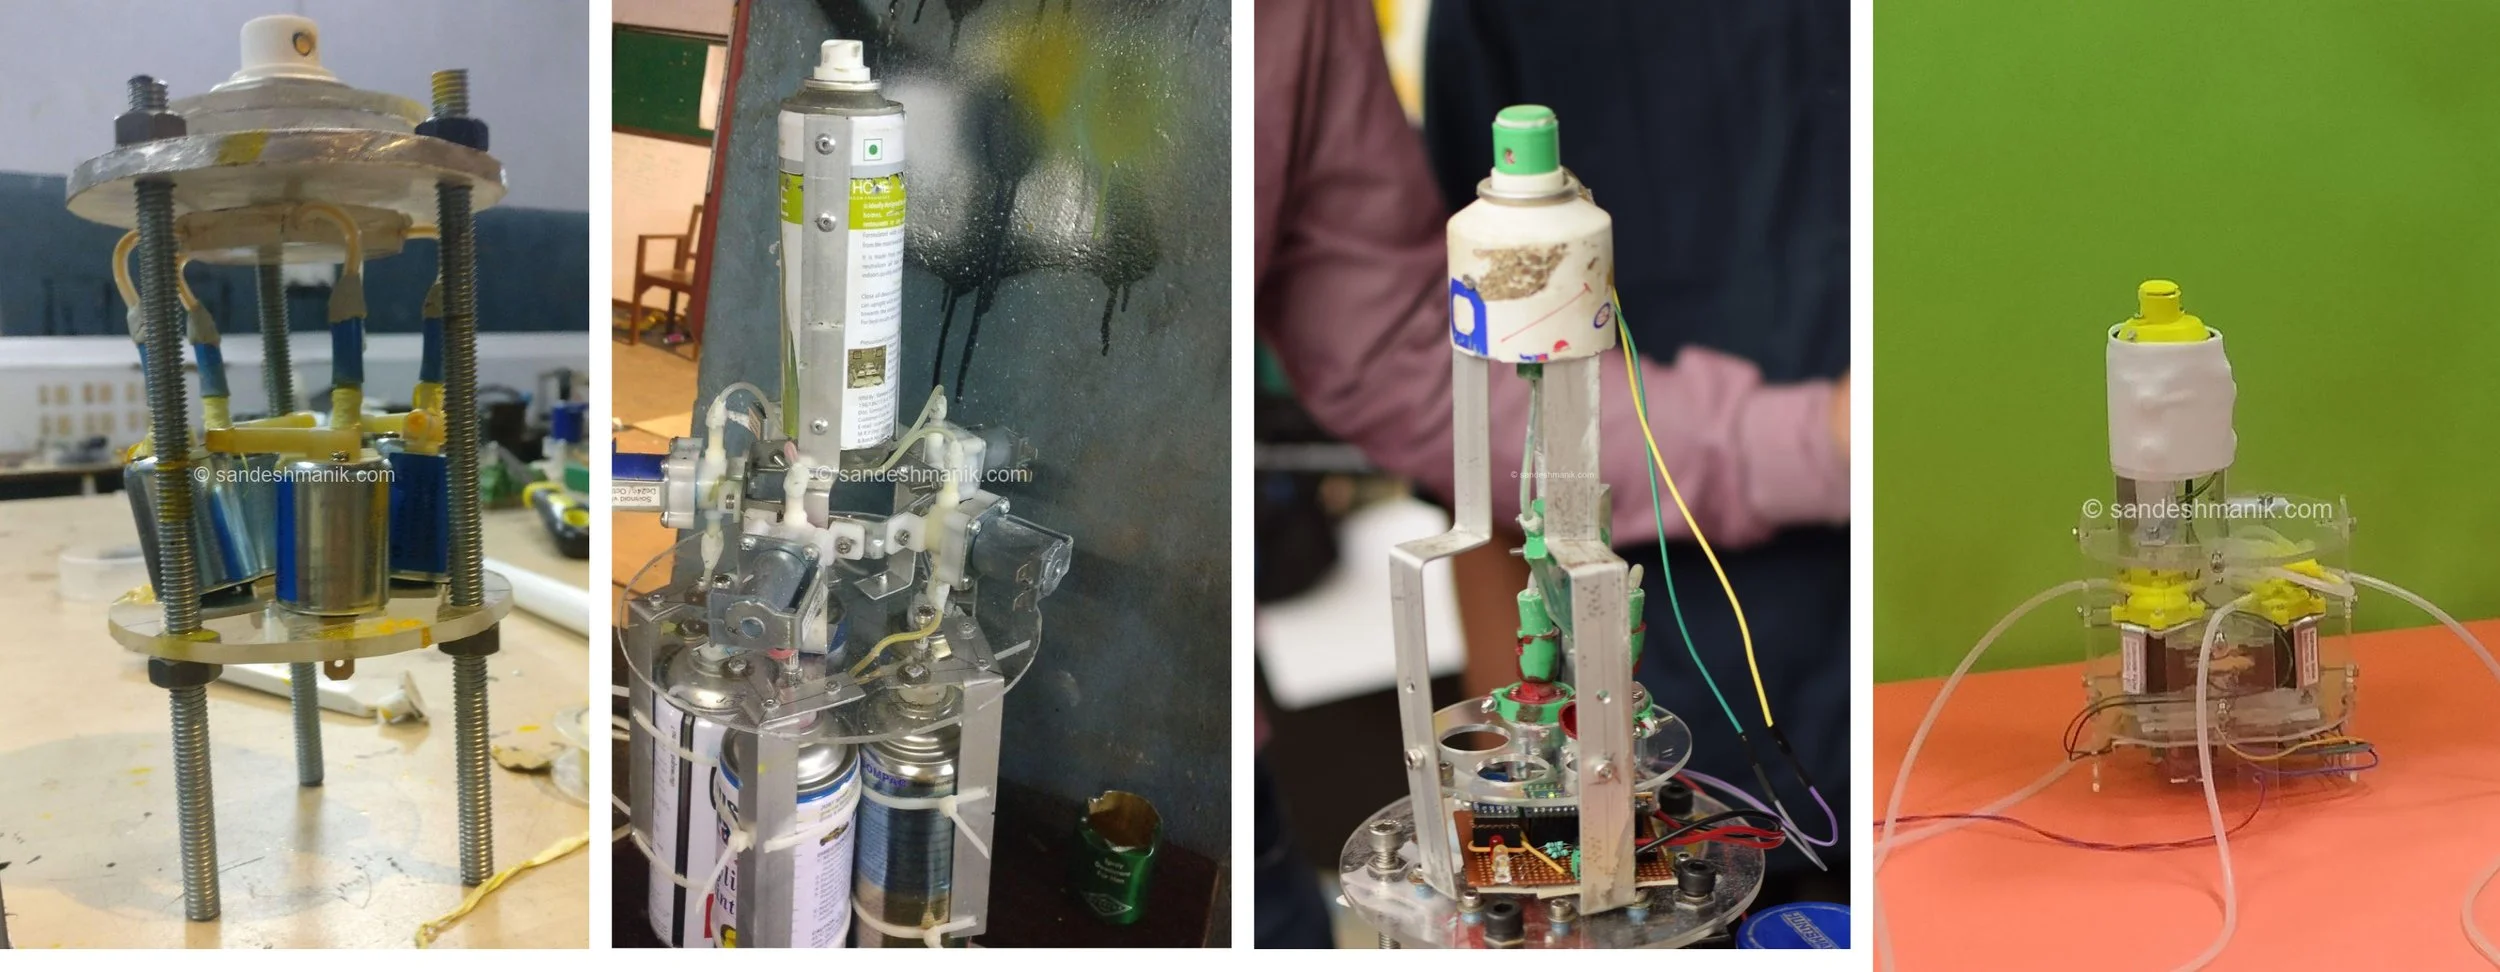
Failed Prototype 1, 2, 3, and 4!
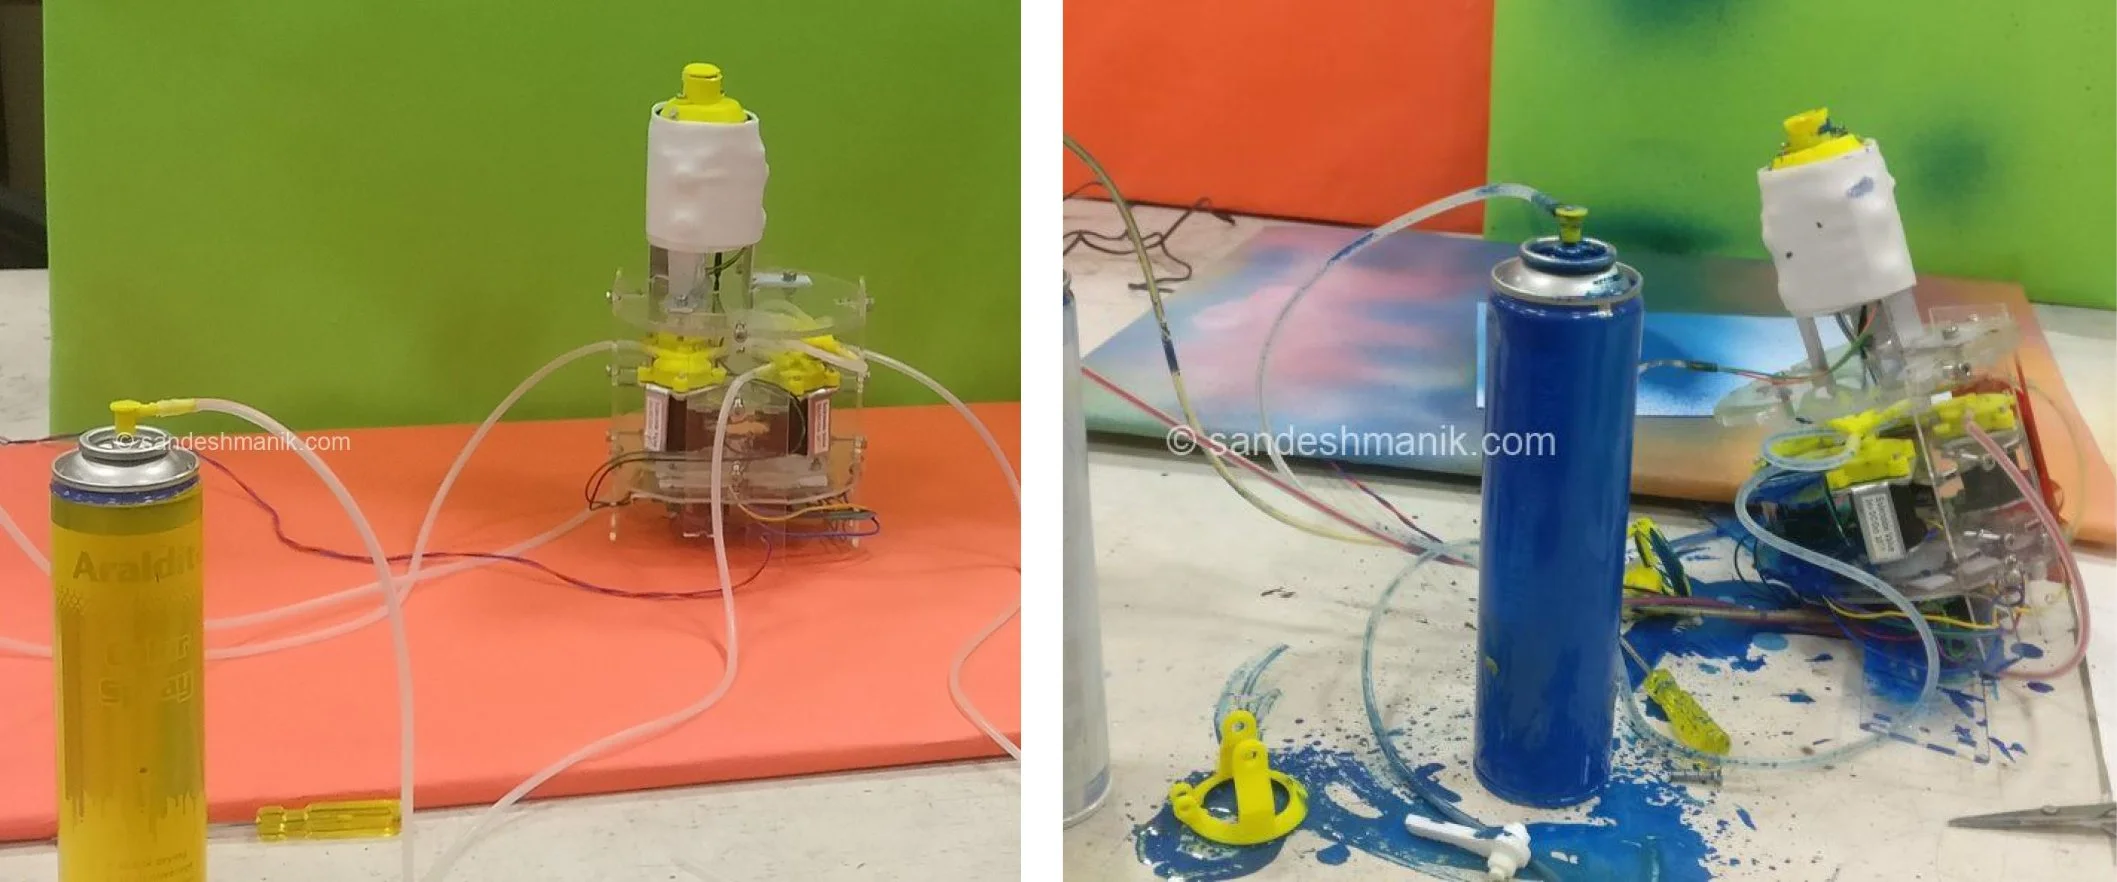
Prototype 4 (left) that took months to build. And then it broke a minute after turning it on (right). :(
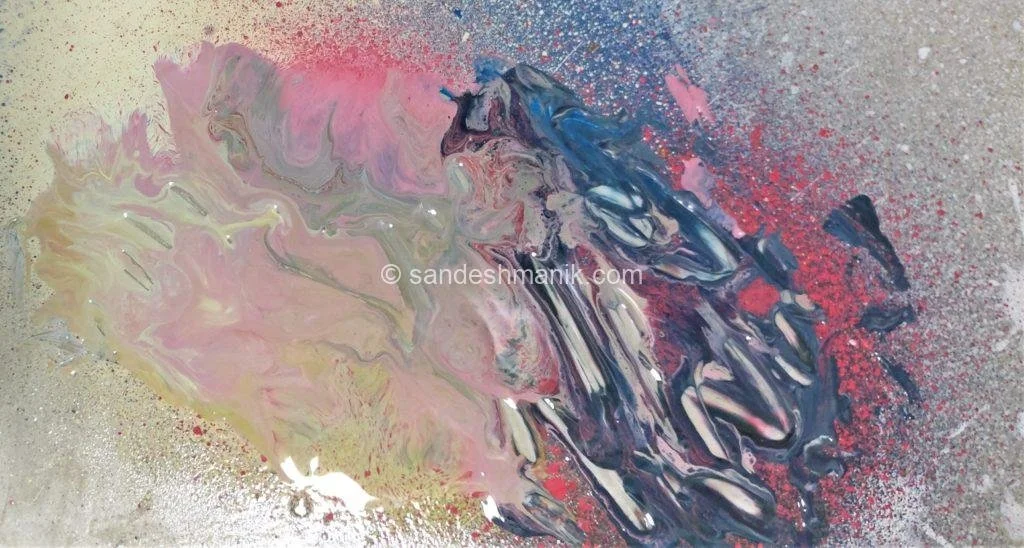
When prototype 3 failed, I seriously considered quitting. But then I noticed these colors on the ground from a paint spill—beautiful shades created from just basic colors mixing naturally. Somehow, seeing this accidental masterpiece gave me the push to keep going. :)